
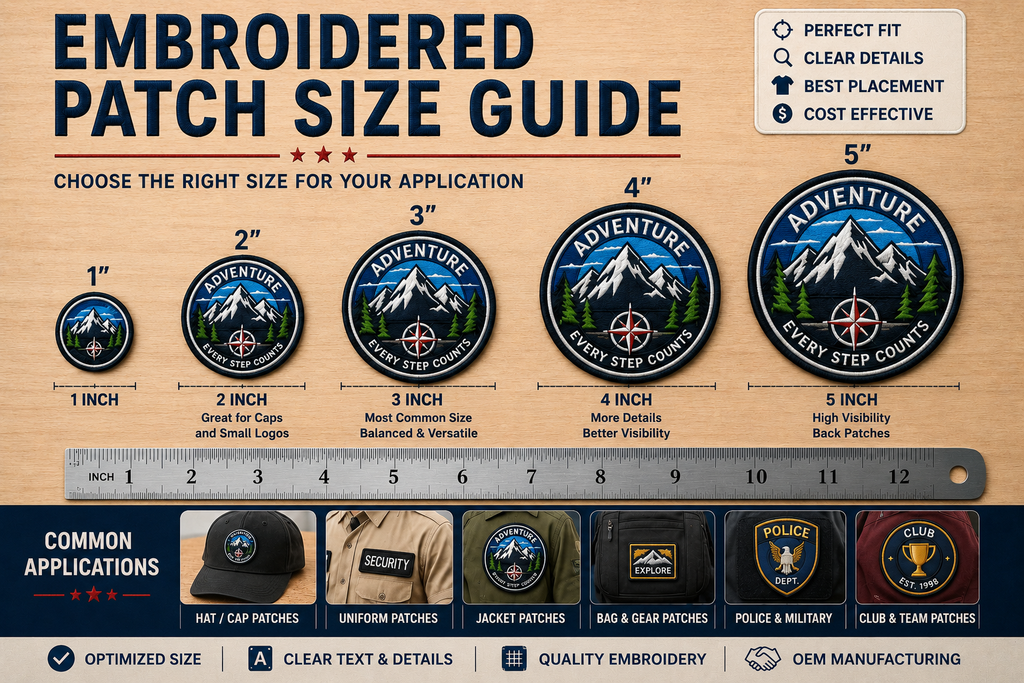
Introduction: Why Embroidered Patch Size Matters
Choosing the right embroidered patch size is one of the most important decisions when developing custom patches for uniforms, workwear, hats, jackets, clubs, military applications, security organizations, sports teams, and branded merchandise. While buyers often focus first on artwork, colors, quantity, or price, patch dimensions can directly influence how clearly a design can be reproduced in embroidery. A logo that looks sharp on a computer screen may contain small lettering, narrow gaps, thin outlines, or complex details that become difficult to reproduce when the design is reduced to a small patch. For this reason, selecting a custom embroidered patch size should not be based on appearance alone—it should also consider embroidery feasibility, placement, visibility, border construction, backing requirements, and the intended use of the finished product.
For OEM buyers, understanding patch sizing is especially important before requesting a quotation or approving a production sample. Increasing or decreasing the dimensions of a patch changes the available embroidery area and can affect stitch count, design definition, material consumption, and overall production cost. Larger patches generally provide more space for detailed logos and lettering, while smaller patches may require artwork simplification to maintain clean embroidery. The ideal size also depends heavily on where the patch will be applied. A compact logo intended for a cap requires different proportions from a large back patch for a jacket, while uniform shoulder patches, police patches, military patches, and workwear badges may each have their own dimensional requirements.
There is therefore no single “best” or universal size for every embroidered patch. The appropriate dimensions should be determined by balancing the original artwork, required level of detail, application area, desired visual impact, and production requirements. This embroidered patch size guide explains how custom patches are measured, common size ranges, recommended dimensions for different applications, and how size can influence embroidery quality, cost, borders, and manufacturing decisions. By understanding these factors before mass production, buyers can communicate specifications more accurately with an OEM embroidery manufacturer and reduce unnecessary artwork revisions, sampling issues, and production delays.
💡 Buyer Tip: When requesting a quotation, provide both the artwork and the desired finished dimensions. If you are unsure about the ideal size, also tell the manufacturer where the patch will be used. An experienced embroidery manufacturer can evaluate whether the requested dimensions provide enough space to reproduce important lettering and design details clearly.
How Are Embroidered Patch Sizes Measured?
Accurate measurement is essential when ordering custom embroidered patches, because even a small difference in the specified dimensions can affect the finished appearance, embroidery proportions, placement, and quotation. In most OEM embroidery projects, patch dimensions are communicated in inches, centimeters, or millimeters depending on the buyer’s market and technical requirements. However, the correct way to measure a patch depends on its shape. A rectangular patch can be specified by width and height, a circular patch is commonly defined by its diameter, and an irregular-shaped patch usually requires its maximum overall width and height.
For buyers, the most important rule is to specify the finished patch size, including the outer edge or border. This gives the manufacturer a clear dimensional reference when preparing embroidery artwork, digitizing the design, calculating production requirements, and developing a sample. Buyers should also avoid measuring only the visible embroidered logo when a border or surrounding background area is part of the finished patch.
Measuring Width and Height
For square, rectangular, shield-shaped, and many conventional patch designs, size is normally expressed as width × height. Measurements should be taken from the outermost finished edges of the patch.
For example, if a rectangular patch measures 4 inches from left to right and 2 inches from top to bottom, the finished specification would be 4″ W × 2″ H.
This distinction becomes especially important when artwork includes a border. The requested dimensions normally refer to the entire finished patch—not just the internal embroidered design. When sending artwork for quotation, buyers should clearly indicate whether the dimensions shown in the file represent the finished patch size.
Measuring Round and Oval Patches
Round embroidered patches are generally specified by their diameter, measured from one finished outer edge through the center to the opposite edge. A circular patch measuring 3 inches across would therefore normally be described as a 3-inch diameter patch.
Oval patches require two dimensions because their horizontal and vertical measurements are different. For example, an oval patch may be specified as 3.5″ W × 2.5″ H.
Round and oval designs are commonly used for organizational emblems, uniform patches, clubs, teams, company logos, and commemorative designs. When these patches include lettering around the perimeter, buyers should consider not only the overall diameter but also whether enough embroidery space remains for the text after the border and margins are taken into account.
Measuring Irregular-Shaped Patches
Irregular shapes require slightly more attention. Instead of measuring along every contour, buyers can usually specify the patch using its maximum overall width and maximum overall height.
For example, an irregular eagle-shaped patch might measure 4.2 inches between the outermost wing tips and 3.1 inches from the highest point to the lowest point. Its overall dimensions would therefore be approximately 4.2″ W × 3.1″ H.
The exact cutting path is then created according to the approved artwork and production file. Complex shapes, sharp corners, narrow projections, and detailed contours may also influence the most suitable edge-finishing method. For this reason, irregular-shaped patches are often evaluated individually rather than treated exactly like standard circular or rectangular patches.
💡 Buyer Tip: When requesting a quotation for an irregular-shaped patch, send the original artwork together with the required maximum width or height. If only one dimension is fixed, the manufacturer can usually calculate the other dimension proportionally according to the artwork.
📊 Table: How Different Embroidered Patch Shapes Are Measured
| Patch Shape | Recommended Measurement | Example |
|---|---|---|
| Square | Width × Height | 3″ × 3″ |
| Rectangle | Width × Height | 4″ × 2″ |
| Circle | Diameter | Ø 3″ |
| Oval | Width × Height | 3.5″ × 2.5″ |
| Shield | Maximum Width × Height | 3″ × 4″ |
| Irregular Shape | Maximum Overall Width × Height | 4.2″ × 3.1″ |
Note: Dimensions should normally refer to the finished outer size of the patch, including its border or finished edge.
📖 Extended Reading
- Embroidered Patch Borders: How to Choose the Right Border
- How to Design Artwork for Embroidery
- Custom Embroidered Patches Cost: What Affects the Price?
Common Embroidered Patch Sizes
There is no universal standard size for custom embroidered patches because the ideal dimensions depend on the artwork, intended placement, required visibility, and amount of embroidery detail. However, understanding common embroidered patch size ranges can help buyers estimate what may work best before requesting a quotation or production sample. In general, patches can be grouped into small, medium, and large size ranges, but these categories should be treated as practical references rather than fixed manufacturing standards.
A simple logo with only a few elements may work well at a relatively small size, while a design containing multiple lines of text, detailed symbols, or complex artwork may require additional space. Increasing the dimensions gives embroidery more room to reproduce individual elements, but it also changes the visual impact and may influence stitch count and production cost. For OEM buyers, the goal should therefore be to select the smallest practical size that still preserves the important details of the design while fitting the intended application.
Small Patches: 1–2 Inches
Small embroidered patches in the 1 to 2-inch range are useful when space is limited or when a subtle branding element is preferred. They may be suitable for small logos, simple symbols, compact identification marks, accessories, and certain areas of caps or apparel.
The main limitation is available embroidery space. When artwork is reduced significantly, small lettering, narrow outlines, tiny gaps, and complicated internal details may become difficult to reproduce cleanly with embroidery thread. Unlike a printed image, embroidery is constructed from physical stitches that have their own thickness, direction, density, and spacing requirements.
For this reason, a 1.5-inch patch containing a simple icon may embroider very well, while another 1.5-inch patch containing several words and intricate artwork may require substantial design adjustments. Buyers should evaluate the design complexity and size together, rather than assuming that every logo can be reduced to the same dimensions.
Medium Patches: 2–4 Inches
The 2 to 4-inch range is widely applicable to many types of custom embroidered patches because it provides a useful balance between visibility, embroidery space, and placement flexibility.
Within this range, manufacturers generally have more room to reproduce logos, lettering, borders, and multiple design elements than with very small patches. Medium-sized patches can be used for uniforms, workwear, company branding, clubs, organizations, sports teams, bags, jackets, and many other applications.
However, buyers should not interpret this range as a guaranteed size recommendation. A 3-inch patch may provide ample room for one design but still be too small for another containing extensive lettering or complex details. The artwork should always be reviewed together with the requested finished dimensions before mass production.
Large Patches: 4–6 Inches and Above
Large embroidered patches measuring approximately 4 to 6 inches or more provide substantially greater visual presence and more embroidery space. They are commonly considered when the patch needs to be highly visible or when the artwork contains larger lettering, multiple elements, detailed emblems, or complex graphics.
Applications may include jacket patches, large organizational emblems, motorcycle or club patches, decorative apparel, bags, uniforms, and other products where a prominent embroidered design is required. Some back patches can be considerably larger than six inches, depending on the garment and artwork.
Larger dimensions can improve the available space for embroidery detail, but bigger is not automatically better. The finished patch still needs to fit the intended placement, and increasing its size may increase embroidery area, stitch count, material usage, production time, and ultimately cost. The correct dimensions should therefore balance design reproduction, visual proportion, application, and budget rather than simply maximizing patch size.
💡 Buyer Tip: Do not choose a patch size based only on a generic size chart. Send your artwork and intended application to the manufacturer. Two designs with the same finished dimensions can have very different embroidery requirements depending on lettering, complexity, stitch density, and coverage.
📊 Table: Common Embroidered Patch Sizes and Applications
| Approx. Size Range | Typical Characteristics | Possible Applications | Key Consideration |
|---|---|---|---|
| 1–2 inches | Compact and subtle | Simple logos, symbols, accessories, small branding | Fine details and small text may need simplification |
| 2–3 inches | Versatile compact-medium size | Caps, uniforms, workwear, logos | Check text readability and placement |
| 3–4 inches | Greater visibility and embroidery space | Uniforms, organizations, teams, jackets | Suitable for more detailed designs |
| 4–6 inches | Large and highly visible | Jackets, large emblems, clubs, bags | Consider stitch count, placement, and cost |
| 6+ inches | Oversized / application-specific | Back patches and large decorative designs | Garment dimensions and production requirements should be confirmed |
Note: These ranges are general references rather than fixed industry standards. Custom patch sizes can be produced according to the buyer’s artwork and application requirements, subject to embroidery and manufacturing feasibility.
📖 Extended Reading
- Embroidered Patch Quality: What Buyers Should Check Before Ordering
- High-Density Embroidery & Stitch Count
- How to Design Artwork for Embroidery
Recommended Embroidered Patch Sizes by Application
Choosing the right embroidered patch size becomes easier when the intended application is considered from the beginning. A patch designed for the front of a cap has very different space limitations from a shoulder patch, chest logo, jacket emblem, or large organizational badge. The available placement area, viewing distance, artwork proportions, lettering, garment construction, and desired visual impact should all be evaluated before the final dimensions are confirmed.
For OEM buyers, recommended size ranges should be treated as starting points rather than strict specifications. Uniform suppliers, police and security organizations, apparel brands, clubs, teams, and corporate buyers may already have dimensional requirements based on existing products or internal standards. In those cases, the manufacturer should reproduce the requested dimensions whenever technically feasible. When no dimensions have been established, reviewing the artwork together with its intended placement is usually the most reliable way to determine an appropriate custom embroidered patch size.
Uniform and Workwear Patches
Uniform and workwear patches commonly appear on the chest, sleeve, shoulder, or other designated areas of a garment. Depending on the application, approximately 2 to 4 inches may provide a practical starting range, although actual dimensions can vary considerably.
Company logo patches used on the chest are often kept relatively compact so they do not dominate the uniform. Sleeve or shoulder patches can accommodate larger dimensions, particularly when they include organization names, department information, symbols, or multiple lines of lettering.
The shape of the artwork is equally important. A long rectangular company name patch may require greater width but limited height, while a shield-shaped emblem may require more vertical space. Buyers should therefore specify both the desired dimensions and exact placement whenever possible.
Police, Military and Security Patches
Police, military, security, tactical, and public-service patches often contain more information than simple commercial logo patches. Designs may include department names, unit identification, ranks, flags, emblems, numbers, or text arranged around a central symbol.
Approximately 3 to 5 inches can be a useful reference range for many shoulder or organizational patches, but there is no universal dimension for these applications. Existing uniform specifications, agency requirements, and historical patch dimensions should always take priority over a general sizing recommendation.
For replacement or repeat-production projects, buyers should provide the original specification, physical sample, or accurate dimensions whenever available. This helps maintain consistency between production batches and reduces the risk of creating a patch that does not fit the designated uniform area.
Hat and Cap Patches
Hat patch size requires particular attention because caps provide a relatively limited and curved application area. Front panels also differ depending on cap construction, crown height, seams, and the intended patch position.
A range of approximately 2 to 3.5 inches in width is a useful starting reference for many front-cap applications, but the appropriate height depends heavily on the artwork and available panel space. Horizontal logos can often use more width, while circular, square, or vertically oriented designs may need more careful height control.
Buyers should avoid selecting dimensions based only on the logo itself. The finished patch must also leave enough space around nearby seams, ventilation eyelets, panel transitions, or other structural features of the cap. When possible, providing the cap specifications or available application area can help determine a more suitable finished patch size.
Jacket and Apparel Patches
Jackets and general apparel offer significantly more flexibility. Small chest patches may remain around the medium size range, while sleeve designs can be larger. Back patches may exceed 6 inches and, depending on the garment and design, can be substantially larger.
Because the available area is greater, jacket patches are often suitable for complex logos, large typography, decorative graphics, club emblems, and designs intended to create strong visual impact. However, increasing the size also increases the importance of garment compatibility.
A large embroidered patch can become relatively stiff depending on its construction, embroidery coverage, backing, and overall stitch density. Buyers should therefore consider not only whether the patch physically fits the garment, but also how the finished patch will look and perform after application.
Clubs, Teams and Organization Patches
Clubs, sports teams, associations, schools, events, and other organizations can use a wide variety of custom patch sizes. Approximately 2.5 to 5 inches may work for many applications, but the final dimensions should follow the logo complexity, garment placement, and desired visibility.
Organization patches frequently include a central emblem combined with text around the perimeter. If the patch is made too small, lettering and narrow design elements may lose definition. Increasing the dimensions can provide more embroidery space, but it should still remain proportional to the intended garment or accessory.
For organizations ordering multiple related patches—for example, chest patches, sleeve patches, and larger jacket patches—it may be useful to develop several sizes from the same visual identity rather than simply scaling one embroidery file up or down. Each size can then be optimized individually for embroidery.
💡 Buyer Tip: If you already know where the patch will be applied, measure the available application area rather than estimating the patch size from the artwork alone. Providing your OEM manufacturer with the artwork, target placement, and maximum allowable dimensions can help determine whether the design should be resized or simplified before sampling.
📊 Table: Recommended Embroidered Patch Size by Application
| Application | Approximate Starting Range | Main Sizing Consideration |
|---|---|---|
| Chest / Workwear Logo | 2–4 inches | Visibility without overwhelming the garment |
| Uniform Sleeve / Shoulder | 3–5 inches | Existing uniform specifications and available area |
| Police / Security Patch | 3–5 inches | Agency specifications, lettering, and emblem detail |
| Hat / Cap Patch | 2–3.5 inches wide | Crown height, panel shape, seams, and artwork proportion |
| Jacket Chest / Sleeve | 2.5–5 inches | Garment placement and visual balance |
| Large Jacket / Back Patch | 6+ inches | Garment dimensions, stiffness, stitch count, and weight |
| Club / Team / Organization | 2.5–5 inches | Logo complexity, lettering, and intended visibility |
Note: These dimensions are general reference ranges only. OEM embroidered patches can be manufactured in many custom dimensions according to the buyer’s artwork, existing specifications, garment placement, and production feasibility.
📖 Extended Reading
- Police Embroidered Patches OEM Guide
- Flag Embroidered Patches OEM Guide
- Custom Embroidered Patches MOQ: Complete Buyer Guide
How Patch Size Affects Embroidery Detail
The relationship between embroidered patch size and design detail is one of the most important technical considerations in custom patch production. Unlike printing, where very small graphic elements can sometimes be reproduced with relatively fine resolution, embroidery creates an image using physical thread and stitches. Every letter, outline, gap, border, and decorative element requires enough space for the embroidery machine to form clean and recognizable shapes. As a result, reducing a patch does not simply make every element proportionally smaller—the embroidery itself may need to be redesigned or simplified.
This is particularly important for OEM buyers supplying detailed logos or artwork originally created for digital or printed applications. A design that looks excellent at 4 inches may not remain equally clear when reduced to 2 inches. Small lettering can become difficult to read, narrow gaps may close, and fine outlines can lose definition. The appropriate custom embroidered patch size should therefore be evaluated together with artwork complexity rather than selected independently.
Small Text and Lettering
Text is often one of the first elements affected when an embroidered patch becomes too small. Company names, department names, unit numbers, slogans, locations, and other lettering require enough height and spacing for individual characters to remain distinguishable after embroidery.
There is no single minimum text size that works for every design. Lettering feasibility depends on the font style, uppercase or lowercase characters, stroke thickness, spacing, thread, embroidery direction, surrounding elements, and overall artwork construction. A simple bold uppercase word may remain readable at a smaller size than an intricate serif font or condensed lettering.
For this reason, buyers should be cautious about specifying extremely small patch dimensions when the artwork contains important text. If the required finished size cannot be increased, the artwork may need adjustments such as enlarging critical lettering, increasing spacing, simplifying the font, shortening secondary text, or removing nonessential elements.
Fine Lines and Complex Logo Details
Thin outlines, narrow gaps, small icons, gradients represented through stitches, intricate shapes, and closely positioned design elements can also become problematic when artwork is reduced.
Embroidery thread has physical thickness, and adjacent stitch areas require sufficient separation. If two elements become too close after resizing, they may visually merge. Similarly, a very thin line shown in vector artwork may need to be converted into a wider embroidered element to remain visible in the finished patch.
Complex logos may therefore require embroidery-specific artwork optimization before digitizing. The objective is not necessarily to change the buyer’s visual identity, but to preserve the most important characteristics of the design within the limitations of the requested patch dimensions.
When exact fine detail is critical, increasing the finished patch size can sometimes provide a better solution than forcing excessive information into a restricted embroidery area.
Embroidery Density and Stitch Definition
Patch dimensions also influence how stitches are distributed throughout the design. When a detailed design is compressed into a smaller area, multiple embroidered elements must occupy less physical space. Simply increasing stitch density is not always an effective solution.
Excessive stitch concentration can make an area unnecessarily thick or stiff and may create additional production challenges. Good embroidery digitizing requires a balance between stitch density, stitch direction, underlay, thread coverage, spacing, fabric characteristics, and the dimensions of individual design elements.
Professional multi-head embroidery equipment and embroidery technologies used in industrial production can be referenced through Tajima Group – Industrial Embroidery Technology
Conversely, increasing the patch size creates additional space, but the embroidery file still needs to be optimized for the new dimensions. This is why a production-ready embroidery file should not always be treated like a normal image that can simply be enlarged or reduced without adjustment.
For OEM projects requiring several sizes of the same logo, each size should be reviewed individually to ensure that lettering, line thickness, stitch construction, and other details remain suitable for production.
💡 Buyer Tip: If your logo contains small lettering or complex details, avoid reducing the artwork until everything merely “fits” inside the requested dimensions. Ask the manufacturer to evaluate the artwork at the actual finished size. In some cases, a slightly larger patch or a simplified embroidery version of the artwork can produce a noticeably cleaner result.
📊 Table: Embroidered Patch Size vs Design Detail
| Design Element | Risk When Patch Is Too Small | Possible Production Adjustment |
|---|---|---|
| Small Lettering | Characters may lose readability | Increase text size, spacing, or patch dimensions |
| Thin Lines | Lines may become unclear or disappear visually | Increase line thickness |
| Narrow Gaps | Adjacent embroidery may visually merge | Increase spacing or simplify artwork |
| Complex Symbols | Small internal details may lose definition | Simplify nonessential elements |
| Multiple Design Elements | Artwork can appear crowded | Increase patch size or reduce complexity |
| Dense Embroidery Areas | Excessive stitch concentration may occur | Optimize stitch construction and artwork |
| Same Logo in Multiple Sizes | Direct scaling may reduce embroidery quality | Optimize the embroidery file for each required size |
Note: Embroidery feasibility cannot be determined by patch dimensions alone. Artwork complexity, lettering, thread, fabric, stitch construction, border, and other production factors should also be evaluated.
📖 Extended Reading
- How to Design Artwork for Embroidery
- High-Density Embroidery & Stitch Count
- Embroidered Badges vs Printed Badges: Comparison Guide
How Embroidered Patch Size Affects Cost
The embroidered patch size is an important factor in production cost, but size alone does not determine the final price. Two patches with identical dimensions can have very different manufacturing costs depending on embroidery coverage, stitch count, number of thread colors, artwork complexity, backing, border construction, and order quantity. For this reason, OEM buyers should avoid estimating patch prices solely by comparing width and height.
In general, increasing the dimensions of a patch creates a larger production area and may require more base material, thread, and embroidery time. However, a large patch with relatively low embroidery coverage can sometimes require fewer stitches than a smaller patch containing dense, highly detailed embroidery. The manufacturer therefore needs to evaluate the complete artwork and production specifications before an accurate quotation can be prepared.
Understanding how size interacts with other cost factors can help buyers optimize their specifications without unnecessarily sacrificing embroidery quality.
Embroidery Area and Stitch Count
As the finished patch dimensions increase, the available embroidery area also increases. If the design is scaled proportionally while maintaining similar embroidery coverage, the total stitch count will generally increase.
Stitch count matters because every stitch requires machine running time. A design containing 15,000 stitches requires a different production process from one containing 40,000 stitches, even if both patches appear relatively similar in overall dimensions.
However, patch size and stitch count are not directly interchangeable measurements. A larger patch does not automatically have a higher stitch count than every smaller patch. A 5-inch patch containing large open background areas may require fewer stitches than a densely embroidered 3-inch patch with extensive lettering, borders, and detailed graphic elements.
For OEM quotations, manufacturers therefore evaluate the artwork rather than applying a simple price-per-inch formula.
Embroidery Coverage and Design Complexity
Embroidery coverage describes how much of the patch surface is covered by embroidery. Depending on the design and construction, some patches may use relatively limited embroidery while others approach full embroidery coverage.
A patch with extensive embroidered backgrounds, multiple filled areas, detailed symbols, lettering, and outlines generally requires more machine time than a simple design with significant exposed base fabric.
Design complexity can also influence production efficiency. Numerous small elements, frequent stitch-direction changes, detailed borders, and complicated internal shapes may require more careful digitizing and embroidery construction.
This means that buyers comparing two custom patch sizes should consider both dimensions and coverage. Increasing the size of a simple design may have a different cost impact from increasing the size of a highly detailed, densely embroidered design.
Thread Colors, Backing and Border Requirements
Patch pricing can also be affected by the number of thread colors required in the design. More colors may involve additional production handling and machine setup, and designs with a higher number of thread colors can therefore cost more. Buyers should provide accurate color requirements when requesting a quotation rather than assuming that adding additional colors will always have no effect on pricing. Thread selection is also an important part of embroidery production, particularly when matching colors and maintaining consistent results across OEM orders. For additional information about professional embroidery threads, see FuFu’s Thread – Professional Embroidery Threads
Backing is another factor. Sew-on, iron-on, adhesive, and hook-and-loop configurations involve different materials and manufacturing steps. For larger patches, the amount of backing material required also increases.
The border or edge-finishing method can influence the quotation as well. A conventional shape suitable for a merrowed border may follow a different production process from an irregular-shaped patch requiring precision laser cutting. Size, shape, backing, and border should therefore be evaluated together rather than treated as independent specifications.
Finally, order quantity has a major influence on unit pricing. Fixed preparation and setup costs are distributed across the production quantity, so a higher-volume OEM order can have a lower unit cost than a small order with otherwise identical specifications.
💡 Buyer Tip: For an accurate OEM quotation, send the manufacturer your artwork, finished patch dimensions, quantity, backing requirement, border preference, and delivery destination. Quoting from size alone may not accurately represent the actual production requirements.
📊 Table: How Patch Size and Specifications Can Affect Production Cost
| Cost Factor | Potential Effect on Cost | Why It Matters |
|---|---|---|
| Patch Size | Larger dimensions may increase cost | More base material and potentially more embroidery area |
| Stitch Count | Higher stitch counts generally increase production requirements | More machine running time is required |
| Embroidery Coverage | Higher coverage can increase cost | More thread and embroidery time may be needed |
| Design Complexity | Complex artwork may increase production requirements | More detailed digitizing and embroidery construction |
| Thread Colors | More colors can increase cost | Additional colors may require more production handling and setup |
| Backing | Cost varies by backing type and size | Different materials and processing steps are required |
| Border | Production method can affect pricing | Merrowed and precision-cut edges use different processes |
| Quantity | Larger orders can reduce unit cost | Setup and preparation costs are distributed across more pieces |
Note: The final price of a custom embroidered patch should be based on the complete production specification rather than patch dimensions alone.
📖 Extended Reading
- Custom Embroidered Patches Cost: What Affects the Price?
- Custom Embroidered Patches MOQ: Complete Buyer Guide
- Embroidered Patch Quality: What Buyers Should Check Before Ordering
Embroidered Patch Size vs Border Type
The relationship between embroidered patch size, shape, and border construction is an important consideration when developing custom patches. Buyers sometimes select an edge finish based only on appearance, but not every border type is equally suitable for every patch shape. The outer contour, corner geometry, finished dimensions, and overall design all influence which finishing method can produce the cleanest result.
For relatively conventional shapes such as circles, ovals, squares, rectangles, and shields with smooth contours, a merrowed border can provide the traditional raised edge commonly associated with embroidered patches. For complex or irregular shapes, a precision-cut edge is generally more suitable because the cutting path can follow detailed contours that cannot be produced effectively with a conventional merrowed border.
Patch size also matters because very small designs provide less space for the border, internal embroidery, lettering, and margins. When a buyer requests a compact patch with a thick border and detailed artwork, the usable area inside the border becomes even smaller. Therefore, the finished patch size and border type should be considered together during artwork preparation, rather than selecting each specification independently.
Merrowed Borders for Standard Shapes
A merrowed border creates a raised stitched edge around the perimeter of the patch. It is widely used for traditional embroidered patches with regular or relatively smooth shapes.
Circles, ovals, rectangles, squares, and many shield-shaped designs can be suitable candidates when their contours allow the overlock-style edge stitching to run consistently around the perimeter. The result is a recognizable embroidered-patch appearance with a clearly defined outer edge.
However, the merrowed border occupies physical space around the perimeter. On a large patch, this may represent only a small proportion of the total design area. On a very small patch, the same type of border can take up a more noticeable percentage of the available surface.
For example, reducing the overall dimensions while keeping prominent lettering and a visible border may leave insufficient internal space for the embroidery. In these situations, the artwork proportions, lettering, border thickness, or finished patch dimensions may need adjustment.
Laser-Cut Borders for Complex Shapes
For irregular contours, detailed silhouettes, sharp corners, inward curves, and other complex shapes, a laser-cut edge can provide greater flexibility than a traditional merrowed border.
The cutting path follows the approved patch contour, allowing the finished edge to reproduce shapes that would be difficult to achieve with an overlocked border. This makes precision cutting particularly useful for custom logo outlines, letters, animals, aircraft, symbols, and other non-standard silhouettes.
Laser cutting is also useful when the buyer wants the finished contour to remain visually close to the original artwork rather than surrounding the design with a prominent raised border.
The choice should nevertheless be based on the complete design. Extremely narrow projections, tiny internal curves, or highly complicated contours may still require artwork adjustments to achieve reliable production results. A digital outline that can be drawn on screen is not automatically suitable as a physical embroidered patch edge.
Choosing a Border for Small or Irregular Patches
Small patches require careful consideration because the border competes with lettering and artwork for limited space. A thick or visually dominant edge can reduce the usable embroidery area and make an already compact design appear crowded.
For a simple small circular patch, a merrowed border may still work very well. However, if the same small patch contains multiple protrusions, sharp corners, or a custom silhouette, a laser-cut edge may provide better control over the finished shape.
Irregular patches should also be evaluated according to their maximum width and height, as discussed earlier in this embroidered patch size guide. Buyers should remember that the dimensions describe the overall finished patch, including its outermost contour.
Rather than selecting a border based solely on patch size, the manufacturer should evaluate size, shape, artwork complexity, edge geometry, and intended appearance together. This helps preserve as much usable embroidery area as possible while maintaining a clean and consistent finished edge.
💡 Buyer Tip: If your design has an irregular outline, send the original artwork instead of trying to specify the border from dimensions alone. The manufacturer can evaluate the actual contour and recommend whether a merrowed or laser-cut edge is more appropriate for production.
📊 Table: Patch Size, Shape and Recommended Border
| Patch Design | Border Option to Consider | Main Reason |
|---|---|---|
| Small Circle / Oval | Merrowed Border | Traditional appearance and smooth continuous contour |
| Medium Circle / Oval | Merrowed Border | Regular geometry is well suited to a raised stitched edge |
| Rectangle / Square | Merrowed or Laser-Cut | Selection depends on corner design and desired appearance |
| Shield Shape | Merrowed or Laser-Cut | Smooth shields may suit merrowing; complex contours may require cutting |
| Small Irregular Shape | Laser-Cut | Better control of non-standard outer contours |
| Complex Custom Shape | Laser-Cut | Can follow detailed silhouettes and irregular geometry |
| Large Standard Shape | Merrowed or Laser-Cut | Both may be possible depending on artwork and required finish |
Note: These are general production guidelines rather than fixed rules. The appropriate border should be confirmed after reviewing the actual artwork, finished dimensions, and edge geometry.
📖 Extended Reading
- Embroidered Patch Borders: A Complete Guide to Border Types
- Laser Cutting in Embroidery: Precision Finishing for Custom Patches
- Embroidered Patch Backing Comparison
Common Embroidered Patch Sizing Mistakes Buyers Should Avoid
Selecting an embroidered patch size may appear straightforward, but sizing mistakes are one of the reasons artwork often requires adjustment before sampling or mass production. A buyer may provide a logo and specify a preferred width without considering whether the lettering will remain readable, whether the finished patch will fit the intended garment, or whether the dimensions include the border. These issues can often be identified during artwork review, but providing clear specifications from the beginning can make the OEM development process more efficient.
The most effective approach is to treat patch size as part of the complete production specification. Artwork complexity, placement, border construction, backing, and finished dimensions should be evaluated together. The following sizing mistakes are particularly important for buyers to avoid when ordering custom embroidered patches.
Making a Detailed Design Too Small
One of the most common mistakes is attempting to fit too much information into a small patch. A buyer may want to preserve every word, line, symbol, outline, and decorative detail from the original logo while substantially reducing its dimensions.
The problem is that embroidery cannot reproduce unlimited detail at any size. As the artwork becomes smaller, lettering height decreases, gaps become narrower, outlines become thinner, and individual embroidered elements move closer together.
If the requested size is too small for the artwork, possible solutions include increasing the finished dimensions, enlarging important lettering, removing nonessential details, simplifying certain elements, or developing an embroidery-specific version of the artwork.
The goal is not simply to make the design fit within the requested dimensions. The finished embroidery should remain recognizable, balanced, and suitable for production.
Choosing Size Without Considering Placement
Another common mistake is approving a patch size before confirming exactly where the finished product will be applied.
A 4-inch patch may appear perfectly reasonable when viewed by itself but may be too large for a particular cap panel, chest area, pocket, or sleeve. Conversely, choosing a patch that is unnecessarily small for a large jacket back can reduce visibility and visual impact.
Garment construction must also be considered. Seams, pockets, zippers, curved panels, ventilation openings, and other structural features can reduce the usable application area.
For OEM projects, buyers should ideally measure the available placement area before finalizing the patch dimensions. If the patch will be supplied for use on a specific product, providing the manufacturer with placement dimensions or relevant product information can help reduce sizing problems.
Ignoring Border and Backing Requirements
The outer dimensions of a patch do not exist independently from its construction. Borders and backing requirements should therefore be considered during sizing.
A merrowed border occupies visible space around the patch perimeter. If a compact design already contains lettering or graphics close to the outer edge, adding a prominent border can reduce the available visual margin and make the finished patch appear crowded.
Backing can also affect the intended application. A patch designed for sewing onto a garment may have different practical requirements from a hook-and-loop patch intended to fit an existing loop panel. When hook-and-loop is required, for example, the finished dimensions may need to correspond closely with the available attachment area.
Buyers should therefore confirm the size, border, backing, and application as a complete specification rather than deciding each item separately.
Measuring Artwork Instead of the Finished Patch
A particularly important sizing error occurs when the buyer and manufacturer are referring to different measurement points.
For example, a buyer may describe a logo as 3 inches wide based on the internal artwork, while the manufacturer interprets 3 inches as the total finished width including the border. Although both parties are using the same number, they are describing different dimensions.
For most OEM patch specifications, the clearest approach is to state the finished outer dimensions, measured from the outermost edge of the completed patch. Internal logo dimensions, border thickness, or other measurements can then be provided separately when they are critical to the design.
For irregular-shaped patches, the maximum overall width and height should normally be stated. Providing a dimensioned artwork file can further reduce ambiguity for projects where exact measurements are especially important.
💡 Buyer Tip: Instead of sending a message such as “make this logo about 3 inches,” specify the required finished size, such as “3.0 inches maximum overall width,” and identify where the patch will be applied. Clear dimensional instructions help reduce unnecessary artwork revisions and misunderstandings before sampling.
📊 Table: Common Embroidered Patch Sizing Problems and Solutions
| Sizing Mistake | Possible Result | Recommended Solution |
|---|---|---|
| Detailed artwork made too small | Text and fine details lose clarity | Increase size or simplify nonessential details |
| Size selected before placement is checked | Patch may not fit the intended area | Measure the available application area first |
| Border not considered | Internal design area becomes crowded | Include the border when planning finished dimensions |
| Backing not considered | Patch may not match the attachment area | Confirm backing and application before final sizing |
| Artwork size confused with finished size | Buyer and manufacturer produce different interpretations | Specify finished outer dimensions clearly |
| Irregular shape measured incorrectly | Overall dimensions may be inaccurate | Use maximum overall width and height |
| Same embroidery file used for very different sizes | Stitch quality and proportions may suffer | Review and optimize each required size separately |
📖 Extended Reading
- How to Order Custom Embroidered Patches
- Custom Embroidered Patches Lead Time: Complete Buyer Guide
- OEM Embroidered Patch Manufacturer: Complete Buyer Guide
How to Choose the Right Embroidered Patch Size Before Ordering
Choosing the right embroidered patch size before placing an OEM order requires more than selecting dimensions from a standard size chart. The most suitable size should balance the intended application, available placement area, artwork complexity, lettering, desired visibility, border construction, backing, production requirements, and budget. Because every design is different, buyers should treat general size recommendations as a starting point and confirm the final dimensions according to the actual project.
A practical selection process begins with the application. Once the manufacturer knows where the patch will be used, the artwork can be reviewed at the intended finished dimensions. This makes it easier to identify whether small lettering, narrow lines, complex details, or other elements need adjustment before sampling. For repeat orders or replacement patches, existing specifications should be followed whenever possible to maintain consistency.
For new projects, the following steps can help buyers establish a more reliable custom embroidered patch size before mass production.
Confirm the Final Application
Start by determining exactly where the patch will be applied. A patch for a cap, uniform chest, sleeve, shoulder, jacket, bag, or large back panel will have different dimensional limitations.
Measure the available application area whenever possible. Do not assume that the entire visible garment panel can be used. Seams, pockets, zippers, curved surfaces, hook-and-loop panels, and other structural features can reduce the usable space.
If the patch will be used on an existing uniform or product, providing the maximum allowable width and height gives the manufacturer a practical boundary for evaluating the artwork.
For organizations replacing existing patches, an original sample or established dimensional specification can provide an even more accurate reference.
Review Artwork Complexity and Text Size
After the available area has been determined, review the artwork at approximately the intended finished dimensions.
Pay particular attention to small lettering, narrow gaps, thin outlines, detailed symbols, and closely spaced elements. These features may look clear in a large digital artwork file but become difficult to reproduce after the design is reduced.
If important elements become too small, there are generally two options: increase the finished patch dimensions or optimize the artwork for embroidery. The appropriate solution depends on the application and whether the original design proportions must be maintained.
This review should take place before embroidery digitizing and sampling whenever possible, helping reduce avoidable revisions later in the development process.
Consider Quantity, Budget and Production Requirements
Patch dimensions should also be considered alongside the overall purchasing requirements. A larger patch can require more base material and, depending on the artwork, a higher stitch count and longer embroidery time. Backing, border construction, number of thread colors, embroidery coverage, and order quantity can further influence the quotation.
Buyers working within a target budget should therefore avoid evaluating size independently from the complete specification.
Reducing a patch slightly may sometimes reduce production requirements, but making it too small can create a different problem if the artwork must then be heavily simplified. Likewise, increasing the size purely to preserve every small design element may not be practical if the patch no longer fits its intended application.
The objective is to find a suitable balance between appearance, embroidery feasibility, application, and cost.
Ask Your Manufacturer for a Production Recommendation
When buyers are uncertain about the appropriate size, the embroidery manufacturer should be involved before the specification is finalized.
Provide the original artwork, intended application, preferred dimensions or maximum available area, quantity, backing requirement, and any important design elements that cannot be changed. The manufacturer can then evaluate whether the requested size is practical for embroidery.
For example, a buyer may request a 2-inch patch but provide artwork containing several lines of small lettering. Instead of proceeding directly with an unsuitable specification, the manufacturer may recommend increasing the dimensions or adjusting certain artwork elements.
This type of pre-production review is particularly valuable for OEM orders because it can help reduce repeated sampling, unnecessary revisions, and differences between the buyer’s digital artwork and the final embroidered result.
💡 Buyer Tip: If you are unsure whether to order a 2.5-inch, 3-inch, or 3.5-inch patch, do not choose based on size alone. Send the artwork and tell the manufacturer where the patch will be applied. The best size is the one that fits the application while preserving the important embroidery details.
📊 Table: Embroidered Patch Size Selection Checklist
| Step | What the Buyer Should Confirm | Why It Matters |
|---|---|---|
| 1. Application | Where will the patch be used? | Determines available placement area |
| 2. Maximum Dimensions | What width and height can the application accommodate? | Prevents the finished patch from being too large |
| 3. Artwork | Does the design contain small text or fine details? | Determines whether the requested size is embroidery-friendly |
| 4. Border | Merrowed or precision-cut edge? | Border construction affects usable design space |
| 5. Backing | Sew-on, iron-on, adhesive, or hook-and-loop? | Must match the intended application |
| 6. Quantity | How many patches are required? | Influences production planning and unit pricing |
| 7. Budget | Are there target cost requirements? | Helps balance dimensions and production specifications |
| 8. Sample | Has the final size and embroidery appearance been confirmed? | Helps verify the design before mass production |
📖 Extended Reading
- OEM Embroidered Patch Manufacturer vs Trading Company
- Custom Embroidered Patches Lead Time: Complete Buyer Guide
- Embroidered Patch Quality: What Buyers Should Check Before Ordering
FAQ: About Embroidered Patch Sizes
Choosing the correct embroidered patch size often raises practical questions about dimensions, applications, embroidery detail, and pricing. The following answers address common questions OEM buyers may have before submitting artwork or confirming a custom patch order.
Q1. What Is the Most Common Embroidered Patch Size?
There is no single standard size that applies to every embroidered patch. However, patches in the 2 to 4-inch range are commonly suitable for many applications because they provide a practical balance between visibility, embroidery space, and placement flexibility.
The ideal dimensions still depend on the artwork and intended use. A simple logo may work well at a relatively small size, while a design containing multiple lines of text or complex details may require additional space. Buyers should therefore use common size ranges as a reference rather than as a fixed manufacturing standard.
Q2. What Size Should a Custom Embroidered Patch Be?
The right custom embroidered patch size depends primarily on where the patch will be applied and how much detail the artwork contains.
Before selecting dimensions, measure the available application area and review the artwork for small lettering, narrow lines, and complex elements. The patch should be large enough to reproduce important details clearly while remaining proportional to the garment, cap, bag, uniform, or other product where it will be applied.
Q3. Is a 3-Inch Patch a Good Size?
A 3-inch embroidered patch can be a practical size for many applications, including uniforms, apparel, organizational emblems, and some cap designs. It provides more embroidery space than very small patches while remaining compact enough for many garment placements.
However, 3 inches should not be treated as a universal recommendation. Whether it is suitable depends on the shape and complexity of the artwork. A simple 3-inch logo may embroider clearly, while a detailed design containing extensive small lettering may require larger dimensions.
Q4. What Size Patch Is Best for a Hat?
Many hat patches fall approximately within the 2 to 3.5-inch width range, but the ideal dimensions depend on the cap construction, front-panel size, artwork proportions, seams, and desired placement.
Height is particularly important because the available vertical space on a cap can be limited. Buyers ordering patches for a specific hat should measure the usable panel area or provide product information to the manufacturer before finalizing the patch dimensions.
Q5. What Size Patch Is Best for a Jacket?
Jackets provide considerable flexibility. Smaller chest or sleeve patches may measure approximately 2.5 to 5 inches, while large back patches can exceed 6 inches and may be considerably larger depending on the garment and design.
Rather than choosing dimensions based solely on a general size chart, buyers should consider the available garment area, desired visual impact, embroidery coverage, patch stiffness, and artwork complexity.
Q6. How Small Can an Embroidered Patch Be?
There is no universal minimum size for an embroidered patch because production feasibility depends heavily on the artwork.
Simple symbols and logos can generally be produced smaller than designs containing extensive lettering and intricate details. As the dimensions decrease, text, narrow gaps, fine outlines, and other small elements become more difficult to reproduce clearly.
If a patch needs to be particularly small, the manufacturer should review the artwork at the actual finished dimensions before production.
Q7. Does Embroidered Patch Size Affect the Price?
Yes, embroidered patch size can affect price, but dimensions are only one part of the quotation.
Larger patches may require more base material and potentially more embroidery stitches. However, stitch count, embroidery coverage, artwork complexity, number of thread colors, border, backing, quantity, and other production requirements also influence cost.
For example, a smaller patch with dense full embroidery can have different production requirements from a larger patch containing substantial open background areas. An accurate quotation should therefore be based on the complete specification.
Q8. Does a Larger Patch Provide Better Embroidery Detail?
A larger patch generally provides more physical space for lettering, lines, gaps, and complex design elements, which can make detailed artwork easier to reproduce.
However, increasing size does not automatically guarantee better embroidery quality. Digitizing, stitch direction, density, thread selection, base material, machine settings, and production control also contribute to the final result.
The objective should be to select dimensions that provide sufficient space for the artwork while remaining suitable for the intended application.
Q9. How Are Irregular-Shaped Embroidered Patches Measured?
Irregular-shaped patches are commonly specified using their maximum overall width and maximum overall height, measured between the outermost points of the finished patch.
For example, if a custom-shaped patch measures 4.2 inches between its widest points and 3.1 inches from its highest to lowest point, the dimensions can be specified as approximately 4.2″ W × 3.1″ H.
Providing the original artwork together with these dimensions helps the manufacturer determine the exact cutting contour and finished shape.
Q10. Can an Embroidery Manufacturer Recommend the Right Patch Size?
Yes. If the buyer has not finalized the dimensions, an experienced OEM embroidery manufacturer can review the artwork, intended application, available placement area, lettering, design complexity, border, and other production requirements before recommending a practical size.
For the most useful evaluation, buyers should provide the original artwork together with information about where the patch will be applied and any maximum dimensional limitations.
This allows the manufacturer to recommend dimensions based on actual embroidery feasibility rather than a generic patch size chart, helping reduce artwork revisions and sampling problems before mass production.
CTA: Order Custom Embroidered Patches from Artist Embroidery
Choosing the right embroidered patch size is easier when artwork, application, and manufacturing requirements are evaluated together. Instead of relying only on a generic size chart, OEM buyers can provide their artwork and intended specifications for production review before moving forward with sampling and mass production.
Artist Embroidery Corporation specializes in OEM manufacturing of custom embroidered patches for international buyers, brands, uniform suppliers, organizations, clubs, teams, police and security applications, and other professional projects. From compact logo patches to larger custom-shaped embroidered patches, each project can be evaluated according to its artwork, finished dimensions, embroidery coverage, thread colors, border, backing, quantity, and intended application.
If you already know the required dimensions, provide the finished width and height together with your artwork. For round patches, specify the finished diameter. For irregular-shaped patches, provide the maximum overall dimensions or indicate one fixed dimension so the artwork proportions can be reviewed accordingly.
If you are unsure which size is appropriate, you can also provide the intended application and available placement area. Our team can review whether the requested dimensions provide sufficient space for important lettering and embroidery details before production.
What to Include in Your RFQ
For a faster and more accurate quotation, please provide:
- Artwork or logo file
- Required finished patch size
- Order quantity
- Thread color requirements
- Embroidery coverage or design requirements
- Border preference
- Backing requirement
- Intended application
- Delivery country or destination
- Required delivery date, if applicable
Providing complete specifications allows the project to be evaluated according to actual production requirements rather than patch dimensions alone.
Whether you are developing a new embroidered patch program, sourcing patches for an existing product line, or looking for an OEM manufacturing partner for repeat orders, Artist Embroidery can help evaluate your specifications before production.
Need help determining the right patch size for your artwork?
Send us your design and project requirements for review.
Contact us
Artist Embroidery Corporation
📞 Tel: +886-2-8245-8989
🌐 Website: artistembroidery.com
📧 Email: service@artistembroidery.com
🏢 Office: 7 F., No. 21, Qiao’an St., Zhonghe Dist., New Taipei City 235026, Taiwan
🏭 Factory: No. 12, Zhiwa 2nd Rd., Shetou Township, Changhua County 511006, Taiwan
Made in Taiwan | OEM Embroidery Manufacturing for Global B2B Buyers
About the Author
Artist Embroidery Engineering Team
This guide was prepared by the engineering and sales specialists at Artist Embroidery, a Taiwan-based OEM embroidered patch manufacturer with extensive experience serving military, law enforcement, corporate, fashion, promotional, and industrial customers worldwide.
Our team specializes in custom embroidered patch manufacturing, embroidery digitizing, quality control, material selection, and international OEM production. Every recommendation in this guide is based on real manufacturing experience and practical knowledge gained from producing custom embroidered patches for global brands and organizations.
Last Updated: September 2026
 English
  Japanese
  Chinese
  Korean
  Spanish
  French
  Russian
  Portuguese
  German